
Ultrasound to facilitate shoulder reductions
Posted on: June 25, 2013, by : Sonny Tat MD MPH
by Sonny Tat, Children’s National
Shoulder dislocations are a common dislocation that presents to an emergency room. Anterior dislocation is the most common type of dislocation (95%), followed by posterior and inferior dislocations. Anterior dislocations are the result of a direct blow to an externally rotated, outstretched arm that is adducted.
Traditionally, plain radiographs were used to diagnose dislocation. The disadvantage of this technique is that it is static and positioning the patient with a dislocation shoulder for various radiographic views can be painful. X-ray confirmation of reduction is done after the patient has recovered from sedation. If the reduction is unsuccessful, this necessitates another sedation.
Ultrasound can be used to dynamically diagnose and reduce an anterior shoulder dislocation while the patient is sedated. And because the reduction can be confirmed while the patient is still sedated, using ultrasound can potentially avoid re-sedation.
See labeled ultrasound images of a dislocated shoulder above (still images courtesy of Kristen Breslin and Jo Cohen) and compare it to a normal shoulder. Note the distance between the humerus and glenoid fossa.
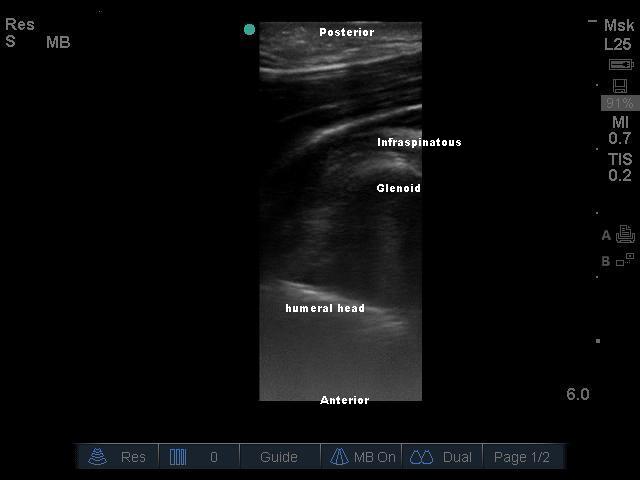 |
| Dislocated Shoulder |
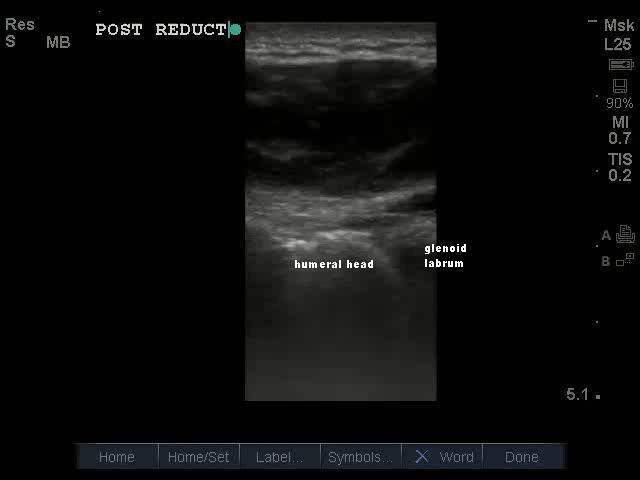 |
| After reduction (normal) shoulder |
Case example
This is a case of 17 year-old boy with a prior history of shoulder dislocation who presented with right shoulder pain after stretching his arm above his head. On examination, he had asymmetric shoulders with anterior displacement of his right humerus, no signs of other shoulder injury, and his distal neurovascular exam was intact. Pre-reduction radiographs showed anterior shoulder dislocation.
Technique
- Patient was seated upright and placed on cardiorespiratory monitoring
- We performed procedural sedation with ketamine (not always required but indicated in this case because of patient pain)
- Linear ultrasound probe in the musculoskeletal setting is placed in a transverse position on the posterior shoulder, below the scapular spine.
- Move the probe laterally until you visualize the glenoid fossa and humeral head. Can you identify the above ultrasound the distance between the humerus and glenoid fossa.
- Stabilize the top of the shoulder with one hand with the thumb holding gentle pressure over the dislocated humeral head.
- With your other hand, abduct the shoulder into an overhead position.
- With the shoulder stabilized by the hand and humerus maintained by the thumb, the shoulder goes back into place when the arm is overhead and externally rotated. (This is the Milch technique, one of several techniques for shoulder reduction)
The next video shows post-reduction images. Note the new location of the humeral head that is now adjacent to the glenoid fossa. (aka “The two white stripes are closer to each other”)
For documentation, the patient underwent post-reduction films after reduction was confirmed on ultrasound and the patient had recovered from sedation. He was discharged from the ED.